
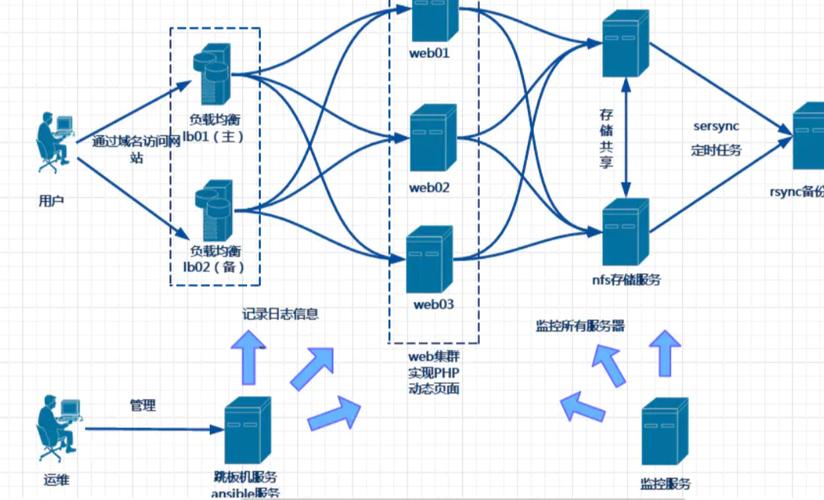
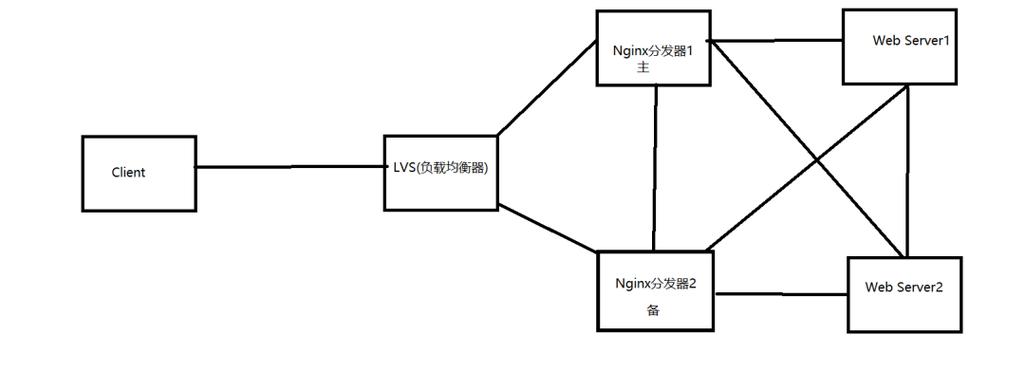
搭建Keepalived Nginx高可用Web集群的步骤如下:

(图片来源网络,侵删)
1、安装FreeBSD操作系统
2、更新系统并安装必要的软件包
pkg update && pkg upgrade
pkg install nginx keepalived
3、配置Nginx虚拟主机
编辑/usr/local/etc/nginx/nginx.conf文件,添加以下内容:
http {
    ...
    include /usr/local/etc/nginx/sitesenabled/*;
    ...
} 创建一个名为default的虚拟主机配置文件/usr/local/etc/nginx/sitesavailable/default,并添加以下内容:
server {
    listen 80 default_server;
    listen [::]:80 default_server;
    root /usr/local/www/apache24/data;
    index index.html index.htm index.php;
    server_name _;
    location / {
        try_files $uri $uri/ =404;
    }
    error_page 404 /404.html;
    location = /404.html {
    }
    error_page 500 502 503 504 /50x.html;
    location = /50x.html {
    }
} 创建一个符号链接到sitesenabled目录:
ln s /usr/local/etc/nginx/sitesavailable/default /usr/local/etc/nginx/sitesenabled/default
4、配置Keepalived
编辑/usr/local/etc/keepalived/keepalived.conf文件,添加以下内容:
(图片来源网络,侵删)
vrrp_script chk_nginx {
    script "/usr/local/etc/keepalived/check_nginx.sh"
    interval 2
    weight 2
}
vrrp_instance VI_1 {
    interface eth0
    state MASTER
    virtual_router_id 51
    priority 100
    advert_int 1
    authentication {
        auth_type PASS
        auth_pass 1111
    }
    virtual_ipaddress {
        192.168.1.100
    }
    track_script {
        chk_nginx
    }
} 创建一个检查Nginx状态的脚本/usr/local/etc/keepalived/check_nginx.sh,并添加以下内容:
#!/bin/sh
if pgrep "nginx" > /dev/null; then
    exit 0
else
    exit 1
fi
给脚本添加执行权限:
chmod +x /usr/local/etc/keepalived/check_nginx.sh
5、启动Nginx和Keepalived服务
service nginx start
service keepalived start
至此,你已经成功搭建了一个基于Keepalived和Nginx的高可用Web集群,当主服务器出现故障时,Keepalived会自动将虚拟IP切换到备用服务器,从而实现高可用性。

(图片来源网络,侵删)
【版权声明】:本站所有内容均来自网络,若无意侵犯到您的权利,请及时与我们联系将尽快删除相关内容!


发表回复