
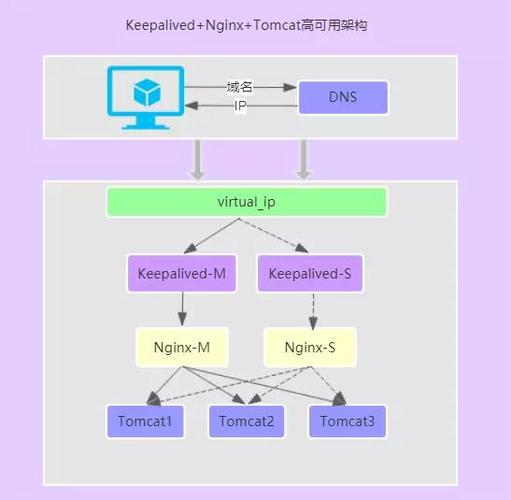
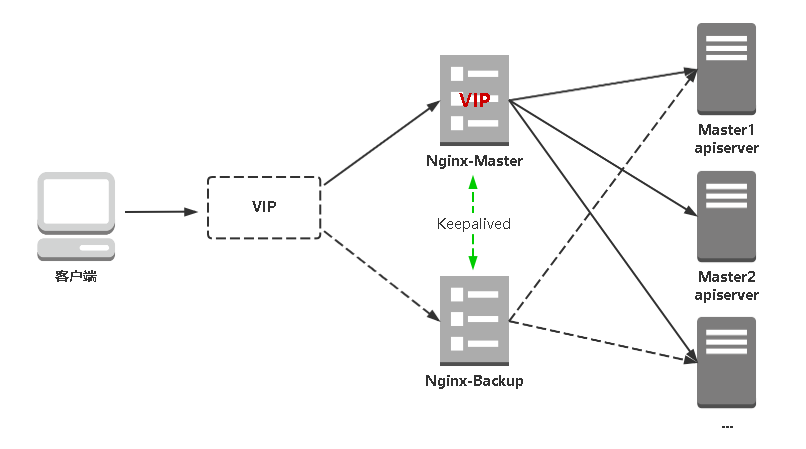
搭建Keepalived Nginx高可用Web集群的步骤如下:

(图片来源网络,侵删)
1、安装FreeBSD操作系统
2、更新系统软件包
pkg update && pkg upgrade
3、安装必要的软件包
pkg install nginx keepalived
4、配置Nginx
编辑/usr/local/etc/nginx/nginx.conf文件,设置以下内容:
http {
    include       mime.types;
    default_type  application/octetstream;
    sendfile      on;
    keepalive_timeout  65;
    gzip  on;
    gzip_disable "MSIE [16].(?!.*SV1)";
    gzip_types text/plain text/css application/json application/javascript text/xml application/xml application/xml+rss text/javascript;
    server {
        listen       80;
        server_name  localhost;
        location / {
            root   html;
            index  index.html index.htm;
        }
    }
}
5、配置Keepalived
创建两个配置文件,分别为/usr/local/etc/keepalived/keepalived1.conf和/usr/local/etc/keepalived/keepalived2.conf。
在keepalived1.conf中添加以下内容:
(图片来源网络,侵删)
vrrp_instance VI_1 {
    state MASTER
    interface eth0
    virtual_router_id 51
    priority 100
    advert_int 1
    authentication {
        auth_type PASS
        auth_pass 1111
    }
    virtual_ipaddress {
        192.168.1.100
    }
} 在keepalived2.conf中添加以下内容:
vrrp_instance VI_1 {
    state BACKUP
    interface eth0
    virtual_router_id 51
    priority 50
    advert_int 1
    authentication {
        auth_type PASS
        auth_pass 1111
    }
    virtual_ipaddress {
        192.168.1.100
    }
} 注意:请根据实际情况修改interface和virtual_ipaddress的值。
6、启动Nginx和Keepalived服务
sysrc nginx_enable="YES"
service nginx start
sysrc keepalived_enable="YES"
service keepalived start
7、验证高可用集群是否正常运行
使用浏览器访问虚拟IP地址(192.168.1.100),如果能够正常访问,说明高可用集群已经搭建成功。
(图片来源网络,侵删)
【版权声明】:本站所有内容均来自网络,若无意侵犯到您的权利,请及时与我们联系将尽快删除相关内容!


发表回复