
这是一个关于如何在SpringBoot中执行Hive SQL的调测样例程序。请参考以下代码:,,“
java,@Autowired,private JdbcTemplate jdbcTemplate;,,public List executeHiveSql(String sql) {, return jdbcTemplate.queryForList(sql);,},`,,在这个示例中,我们使用JdbcTemplate来执行Hive SQL语句并返回结果。你需要在SpringBoot项目中配置Hive数据源,然后注入JdbcTemplate`。调测Hive SpringBoot样例程序


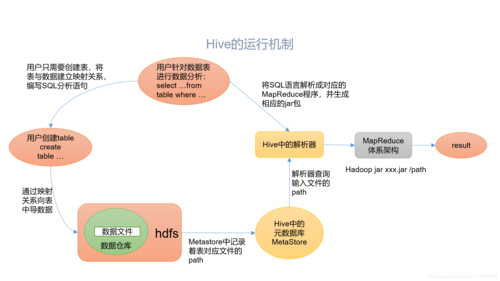
(图片来源网络,侵删)
在Spring Boot应用程序中使用Hive进行数据查询和分析是一项常见的任务,下面是一个简单的步骤指南,演示如何调测一个使用Hive的Spring Boot样例程序。
1. 添加依赖
确保你的pom.xml文件中包含了必要的依赖项:
<dependencies>
    <! Spring Boot Starter for Hive >
    <dependency>
        <groupId>org.springframework.boot</groupId>
        <artifactId>springbootstarterdatahadoop</artifactId>
    </dependency>
    <! Other necessary dependencies >
</dependencies>
2. 配置Hive连接
在application.properties或application.yml文件中,配置Hive连接信息:
application.properties
hive.server2.thrift.port=10000
hive.server2.transport.mode=binary
hive.metastore.uris=thrift://localhost:9083
3. 创建Hive配置类
创建一个配置类来初始化Hive的DataSource和SessionFactory:
import org.apache.hive.jdbc.HiveDriver;
import org.springframework.beans.factory.annotation.Value;
import org.springframework.context.annotation.Bean;
import org.springframework.context.annotation.Configuration;
import org.springframework.jdbc.datasource.SimpleDriverDataSource;
import javax.sql.DataSource;
import java.sql.SQLException;
@Configuration
public class HiveConfig {
    @Value("${hive.server2.thrift.port}")
    private String hiveServerPort;
    @Value("${hive.server2.transport.mode}")
    private String hiveTransportMode;
    @Value("${hive.metastore.uris}")
    private String hiveMetastoreUris;
    @Bean(name = "hiveDataSource")
    public DataSource dataSource() throws SQLException {
        SimpleDriverDataSource dataSource = new SimpleDriverDataSource();
        dataSource.setDriverClass(HiveDriver.class);
        dataSource.setUrl("jdbc:hive2://localhost:" + hiveServerPort + "/default");
        dataSource.setUsername(""); // Set your username if needed
        dataSource.setPassword(""); // Set your password if needed
        return dataSource;
    }
}
4. 创建Repository接口
(图片来源网络,侵删)
创建一个继承自JdbcRepository的接口,用于执行Hive查询:
import org.springframework.data.jdbc.repository.query.Query;
import org.springframework.data.repository.CrudRepository;
import org.springframework.stereotype.Repository;
@Repository
public interface HiveRepository extends CrudRepository<Object, Object> {
    @Query("SELECT * FROM my_table")
    List<Map<String, Object>> findAllFromMyTable();
}
5. 测试查询功能
在你的服务类中注入HiveRepository并调用查询方法:
import org.springframework.beans.factory.annotation.Autowired;
import org.springframework.stereotype.Service;
import java.util.List;
import java.util.Map;
@Service
public class HiveService {
    private final HiveRepository hiveRepository;
    @Autowired
    public HiveService(HiveRepository hiveRepository) {
        this.hiveRepository = hiveRepository;
    }
    public List<Map<String, Object>> getAllDataFromMyTable() {
        return hiveRepository.findAllFromMyTable();
    }
} 你可以在你的控制器或其他组件中调用HiveService的方法来获取Hive表中的数据。
6. 运行和测试应用程序
编译并运行你的Spring Boot应用程序,然后通过HTTP请求或其他方式调用相关服务以验证Hive查询是否正常工作。
7. 调试和优化
如果遇到问题,可以使用日志记录、断点调试等工具来定位和解决问题,还可以考虑对查询进行性能优化,例如使用索引、分区等技术。
(图片来源网络,侵删)
通过以上步骤,你应该能够成功地在Spring Boot应用程序中集成和使用Hive进行数据查询和分析,这只是一个基本示例,实际应用可能需要更多的配置和优化。
【版权声明】:本站所有内容均来自网络,若无意侵犯到您的权利,请及时与我们联系将尽快删除相关内容!

发表回复